kun432's blog

Alexaなどスマートスピーカーの話題中心に、Voiceflowの日本語情報を発信してます。たまにAWSやkubernetesなど。

〜スマートスピーカーやVoiceflowの記事は右メニューのカテゴリからどうぞ。〜

Basic tutorial for In-Skill Purchasing on Voiceflow: One-time purchases Part1

f:id:kun432:20200327231242p:plain

NOTICE: For Voiceflow's biggest UI updates, I will revise all this tutorial. So stay tuned!

Hi, I've createed a basic tutorial for how to create an in-skill purchasing skill using Voiceflow. This tutorial will consist of 2 or 3 parts, and this is part1 today.

In this tutorial, we will create a sample skill with ISP feature step-by-step. This sample skill is based on Amazon's official ISP sample, which is available on Github. So, you can try coding too if you are interested with it.

Here are some notes.

  • not completely same as Amazon's sample. I just simplified a little.
  • I've tested this sample working at the time of writing, but it may not work in the future.
  • The main purpose for this tutorial is for understanding the basic of ISP and how to implement on Voiceflow. So, I will not guarantee if this sample passes Amazon's certification (maybe not). Generally, certificaition for ISP is more difficult than those for no-ISP skills. you may need to add some more features for passing certification. See Amazon's official documents.
  • This tutorial may not be for newbies. At least, you should...
    • be familar with the concept of intent/utterances/slots.
    • have some experiences with creating a skill with Voiceflow, especially Speak/Choice(formerly Interaction, not old Choice)/Flow blocks.
    • have some testing experiences with Alexa Develper Console because you can test ISP only on Alexa Developer Console or Echo devices. not works in Voiceflow Test.

We will create a skill named "Premium Hello World". This is a very simple skill.

  • You say "Hello", then Alexa say "Hello" in various ways. That's it!!!
  • But if You buy a in-skill product called "Greetings Pack" and say "Hello", then Alexa say "Hello" in various languages randomly.
  • "Greetings Pack" is one-time purchase typed in-skill product. Once users buy it , they can listen to various international "Hello" forever unless users disable the skill. Updates: I changed this from subscription type to one-time purchase type because subscription requires you to care more in detail than one-time purchase and it's not good for the first-time basic tutorial.

ok. Let's begin!

Create Project

Let's start with creating a new project called "Premium Hello World". For this time, we choose "English(US)" for US skills. If you are living outside of the U.S., you can choose other locales based on where you live and also you can translate all the speech texts in your language.

Create Basic Feature

For ISP, we will need to create various features such as basic, premium, buying, upselling, cancelling, etc... First of all, Let's start with basic flow and add each feature step by step.

Basic feature works like this:

Alexa, open Premium Hello World.

Welcome to Premium Hello World, you can say hello! How can I help?

Hello

Hello. Would you like another greeting?

Yes

Howdy! Would you like another greeting?

No

OK. Goodbye!

Sounds very simple and easy, right? OK, now we will start to create this flow.

Put 2 speak blocks and connect like this.
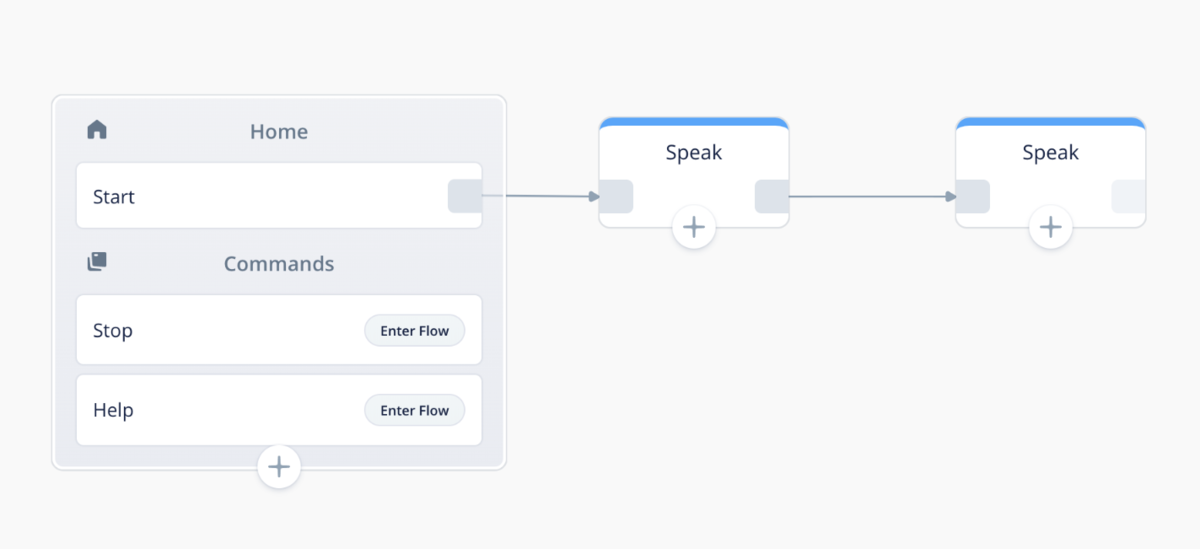
f:id:kun432:20200312001408p:plain

Type speech texts in each speak block, like these.

f:id:kun432:20200312001509p:plain

f:id:kun432:20200312001525p:plain

Next, we put choice block and create an Intent named "basic_hello_intent".
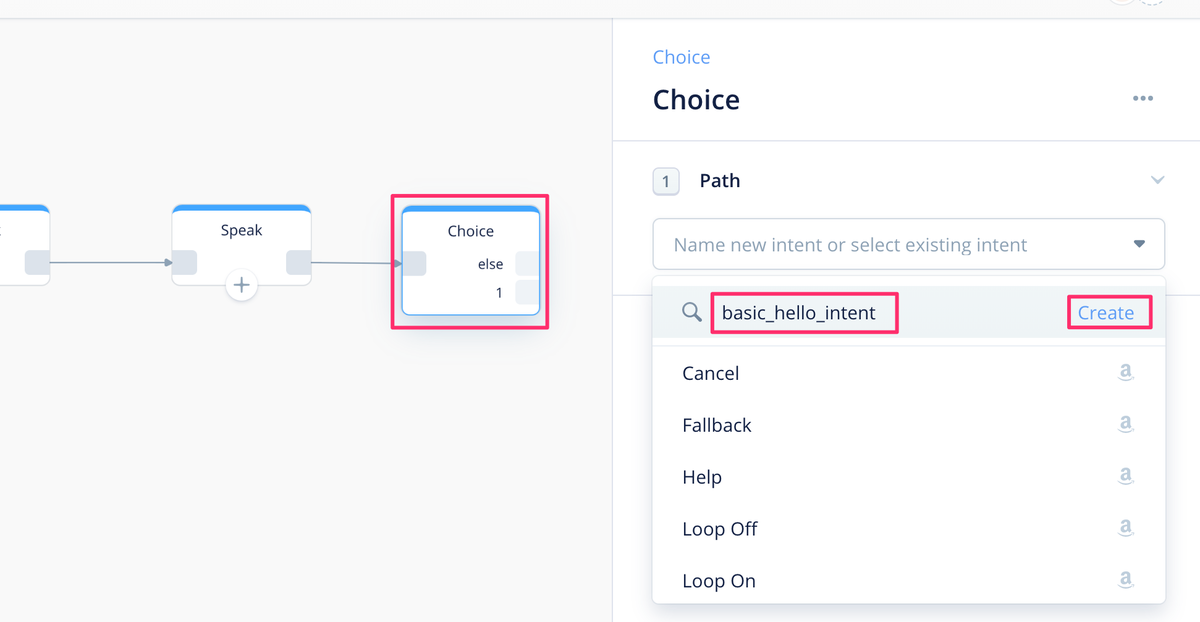
f:id:kun432:20200312002916p:plain

Add an utterance "Hello" for this intent. Then, users will go to basic_hello_intent when users say "Hello".
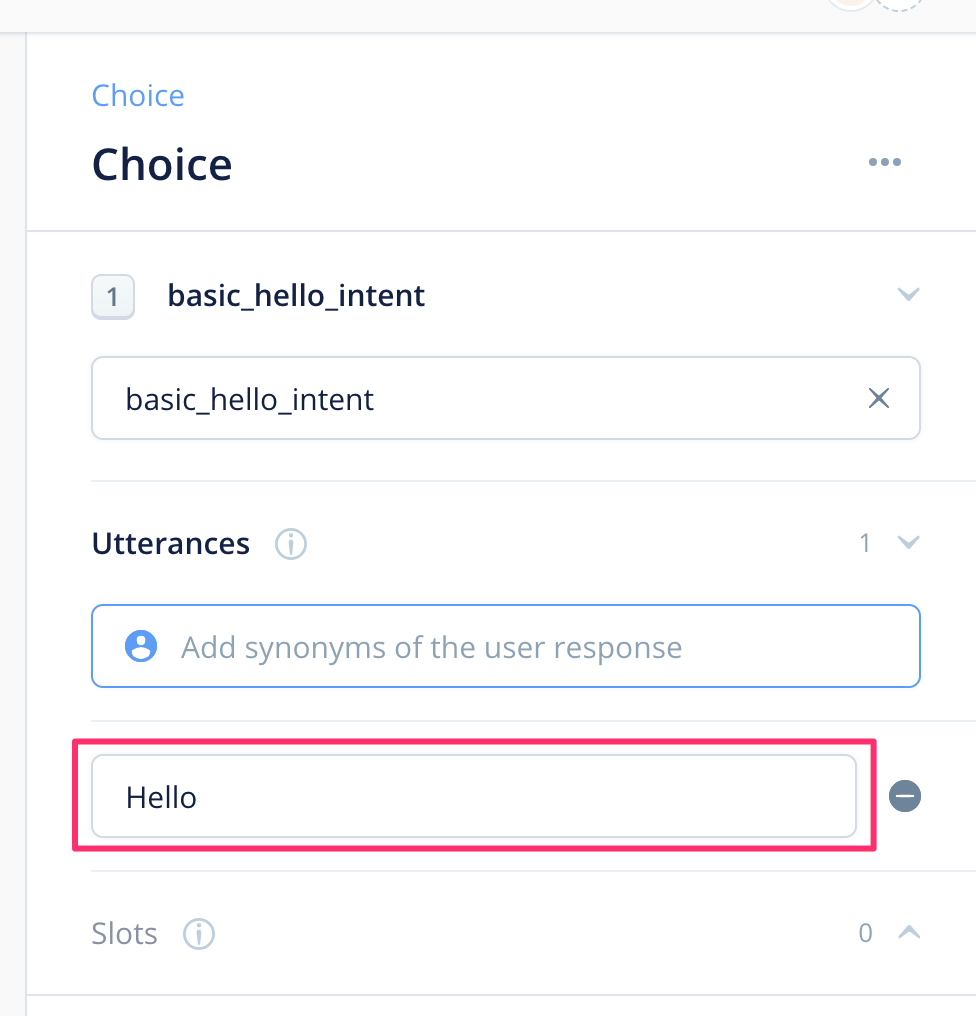
f:id:kun432:20200312003040p:plain:w400

Also, when users say other than "Hello", users will go to Else path. This means users say something what we don't expect. So put a speak block for urge users to say again something we expect and return to choice block.
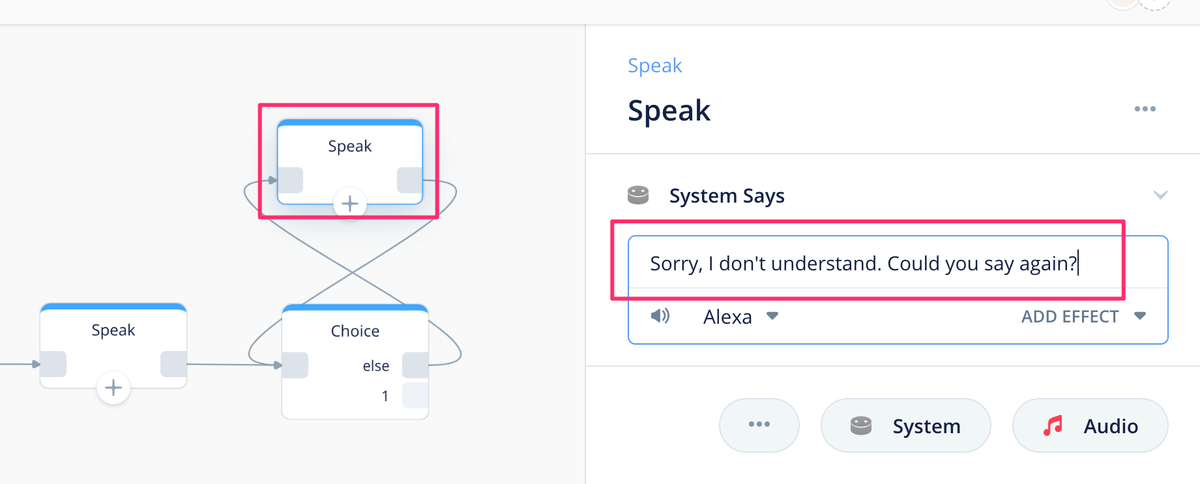
f:id:kun432:20200312004333p:plain

After users say "Hello", then it's Alexa's turn. As I mentioned in the conversation dialog sample above, Alexa will say not only "Hello", but also "Howdy!". We can do this randomly by enabling "randomize outputs" option in speak block.

Put a speak block after choice block and type "Hello!" in speak block. Then click on "system" below.
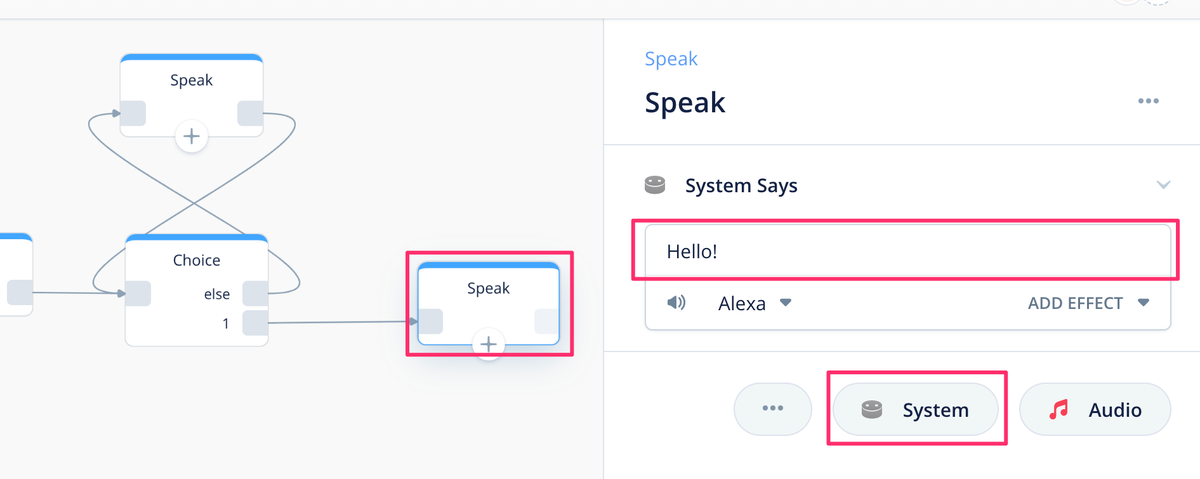
f:id:kun432:20200312010204p:plain

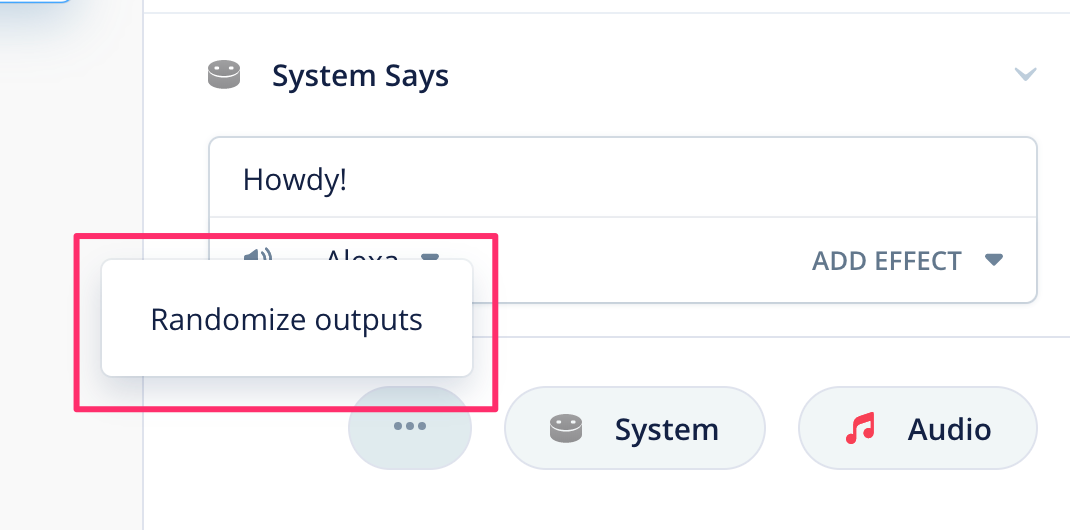
A new speech text field should be added under "Hello", so type "Howdy!" and click ellipsis icon at the bottom.
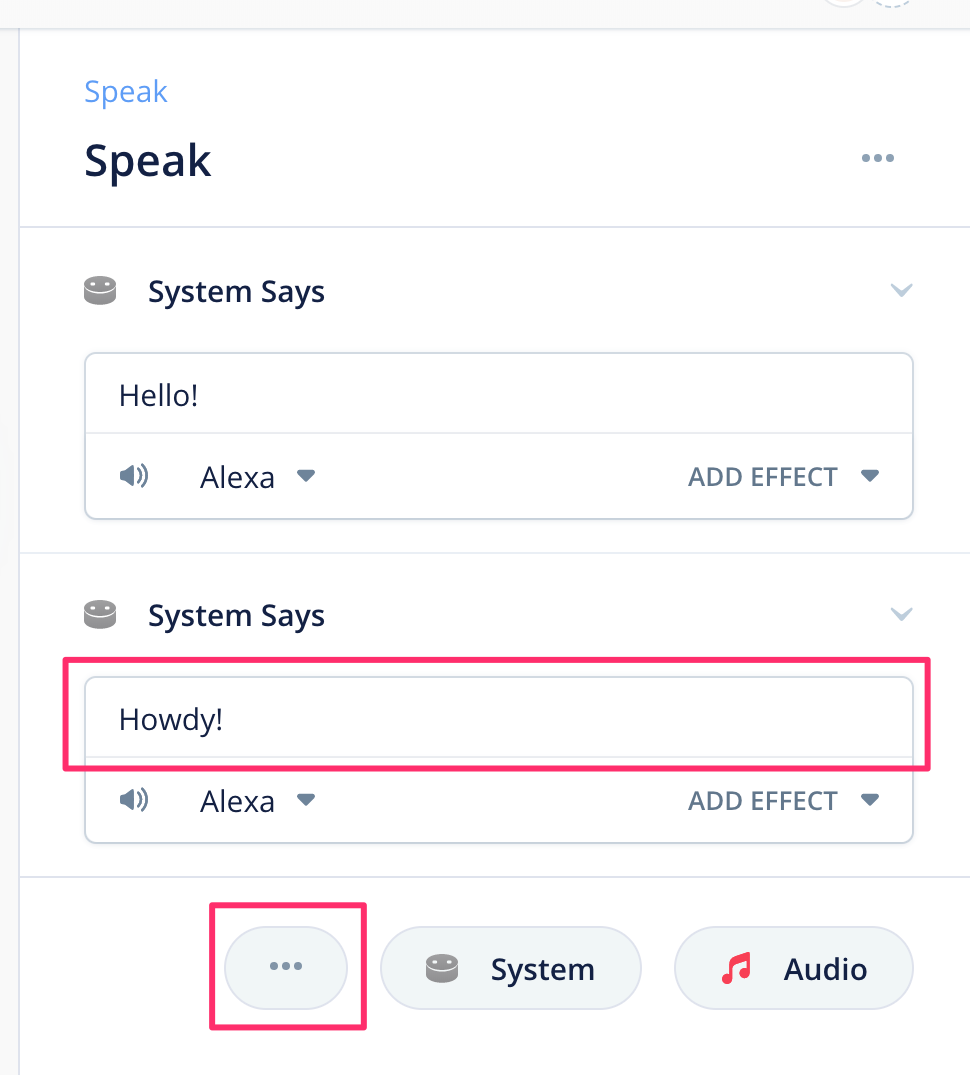
f:id:kun432:20200312010803p:plain:w400

"Randomize outputs" shows up, then click on this.
f:id:kun432:20200312011103p:plain:w400

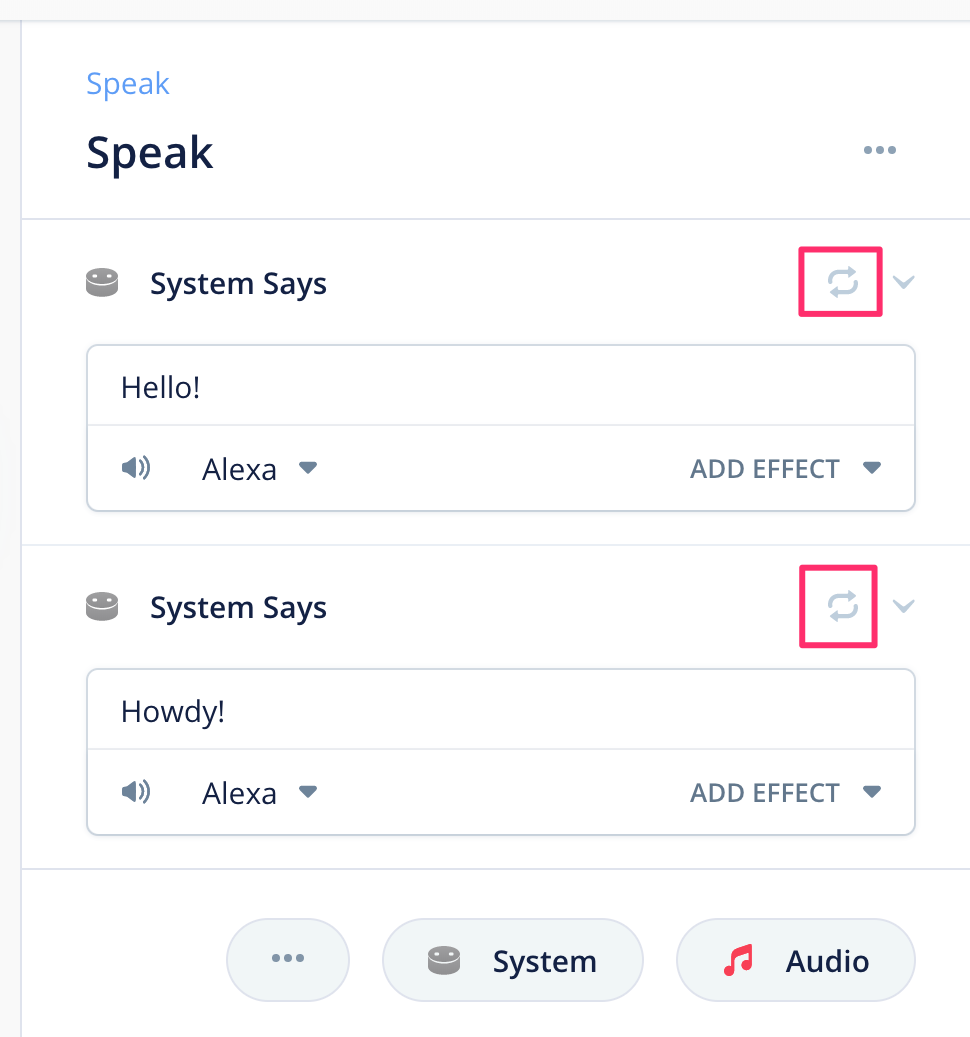
We will see small icons at very right of each "System says". Now Alexa will say one of speech texts randomly.
f:id:kun432:20200312011357p:plain:w400

We can add more speech texts by clicking on "System" icon. Also, if you want to disable randomize, click ellipsis icon again and click "Unrandomize outputs". In this tutorial, we will go "randomize" because it will be more like human!

f:id:kun432:20200312013122p:plain:w400

After Alexa says, we will ask users to say again or not. Put speak block and type like these. We use randomize here again.

f:id:kun432:20200312015323p:plain

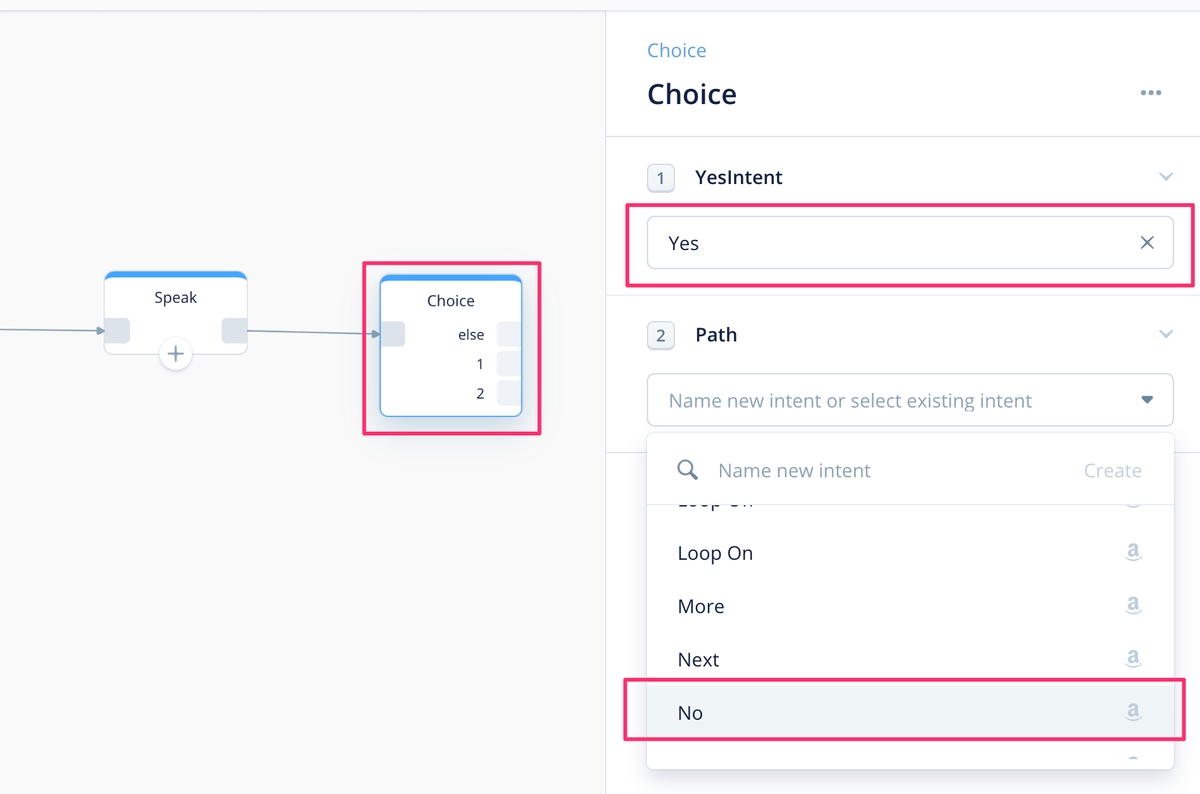
Put choice block to capture users' answer, "Yes" or "No". For Yes or No, we can use built-in YesIntent and NoIntent. It's so easy that we don't need add any utterances and also recognition for built-in intents is very accurate.
f:id:kun432:20200315002324p:plain

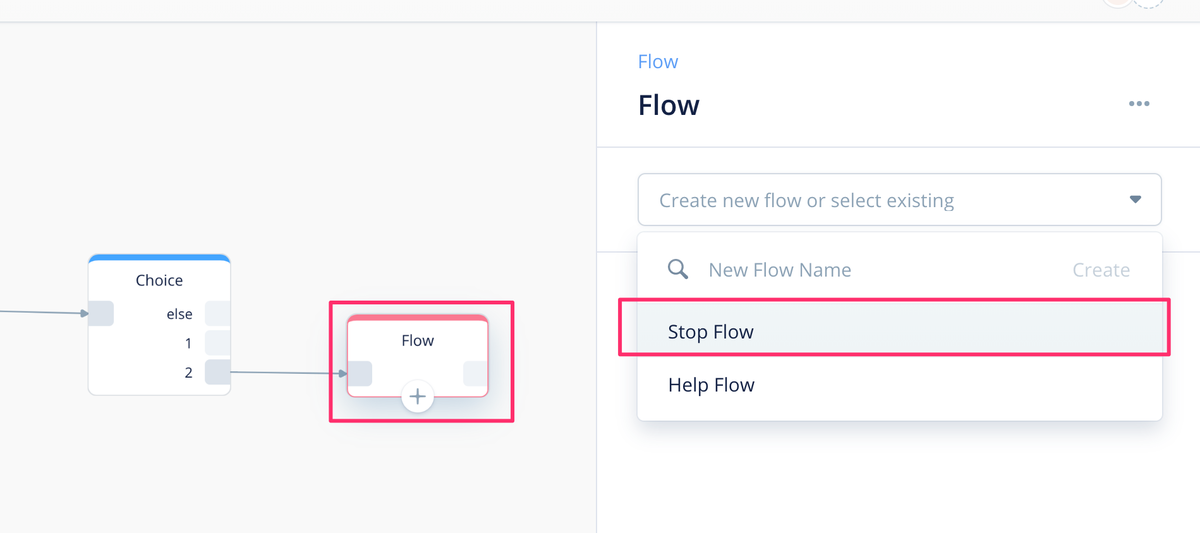
If users say "No", skill will end, so put a flow block and select "Stop". Stop flow is a Voiceflow's built-in and It will be and should be called anywhere in the skill when users say "Stop", but like this, you can use this as exit block at the end of flow.
f:id:kun432:20200315003216p:plain

Click on "Enter Flow", then will go to inside of Stop flow.

f:id:kun432:20200315003413p:plain

We are now the inside of Stop flow and there are speak block and exit block combined into one block. So Alexa will say something and this skill will end.

f:id:kun432:20200315003809p:plain

Change Alexa's speech text in speak block like this and randomize here too. I love randomize!

f:id:kun432:20200315003623p:plain

Click on home at upper left of canvas and go back to the main flow.
f:id:kun432:20200315010354p:plain:w400

Next, if user say "Yes", Alexa will say "Hello" again, so connect "Yes" choice of choice block back to speak block which say randomized "Hello".

f:id:kun432:20200315013156p:plain

This is somehow unclear. We can arrange the layout of choice block like this.

f:id:kun432:20200315013317p:plain

Looks like 8-shaped looping. Now it's very clear how conversation flow goes, isn't it? IMO, this 8-shaped looping is a handy but practical technique for arranging the layout of block in Voiceflow. Also, we can see that we used the same technique for choice block on the left.

It's another time we use 8-shaped looping for choice block. When users say something other than "Yes" or "No", it will go to else. So, we should put another speak block and connect using 8-shaped looping. Speech text in that speak block will be like below.
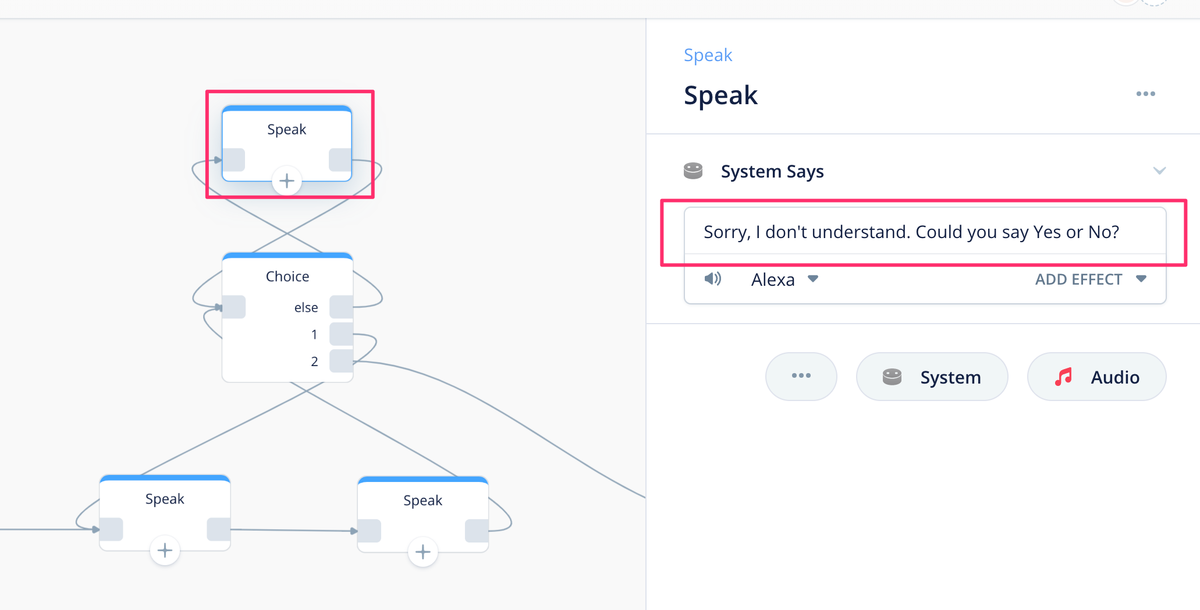
f:id:kun432:20200315015318p:plain

Finally, we've done basic feature for this skill!!! This is the entire flow now.

f:id:kun432:20200315015806p:plain

Let's test on Alexa Developer Console. Click on "Upload to Alexa" and open Alexa Developer Console's test simulator. It should works like this.

f:id:kun432:20200315020244p:plain


Next time, we will add some features for ISP:

  • add an in-skill product as one-time purchase.
  • add intents for buy or refund.
  • add premium feature available when users already purchased.

Will continue to Part2.

スキル内課金商品の説明や画像がどこで使われるか?を調べてみた

スキル内課金使っていますか?そしてスキル内課金対応スキル作っていますか?私は使っていませんし作っていませんw

以前のLTでご紹介しましたが、スキル内課金の実装では、決められたエンドポイントに対して商品IDの購入・キャンセルの情報だけを投げれば一連の購入処理をよしなにやってくれるという、開発者からすると非常に実装が楽な反面、アレクサとユーザの会話がどういう風になるか?というのがわかりにくいです。

で、も一つ、スキル内課金商品の説明がいくつかありますが、あれも実際にはISP側でやってくれるのでどうやって使われるのかがわかりにくいですよね。このあたりが見えないと、スキル内課金につなげる会話をどう組み立てていいのかも迷いがちです。

ということで、今回はスキル内課金商品の説明がどういう風につかわれるのか?を調べてみました。

サンプル

サンプルは公式の「Premium Hello World」を使います。

これを日本語に変更してやってみたいと思います。(まあ日本語化された某レポジトリがあるのでそれを使っていますw)

前提

BUYもCANCELもディレクティブをMonetizationServiceClient経由で投げるだけです

  return handlerInput.responseBuilder
    .addDirective({
      type: 'Connections.SendRequest',
      name: 'Buy',
      payload: {
        InSkillProduct: {
          productId: theProduct[0].productId,
        },
      },
      token: 'correlationToken',
    })
    .getResponse();

つまり商品IDと購入(BUY)かキャンセル(CANCEL)かだけです。商品の説明などは一切意識しません。つまりこれらはすべてアレクサ側で制御されます。

UPSELLだけちょっと違うのでそこは後ほど。

スキル内商品の登録

上記のレポジトリでは、買い切り型とサブスクリプション型が用意されているますが、買い切り型の方で説明します。

f:id:kun432:20200314204919p:plain

説明文がある箇所は4箇所あります。それぞれの用途を踏まえて、内容を微妙に変えてみました。サブスクリプション型もほとんど同じような感じで設定しました。

説明

ツールチップには以下とあります。

商品の説明やユーザーができることをわかりやすく説明した文章です。

まあシンプルな説明ということですね。ただgithubを見ると、以下ともあるので、どうもアレクサがしゃべる箇所があるようです。

Summary description of the product. Customers will hear this.

以下のように設定しました。

挨拶パックでは、様々な言語の挨拶を聞くことができます。

詳細な説明

ツールチップには以下とあります。

商品の機能や使用するための前提条件を説明した詳細な説明です。これは、オファーや画面付きデバイスに表示される購入カードで使用されます。

githubではこうです。

A full description explaining the product's functionality and any prerequisites to using it. Customers will see this.

より詳細な説明です。上記にあるように画面付きデバイスなどで表示されるようです。以下のように設定しました。

挨拶パックでは、フランス語、スペイン語、ヒンズー語など、様々な言語の挨拶を聞くことができます。

購入プロンプトの説明

ツールチップには以下とあります。

ユーザーが購入を実行したときに聴く商品の説明です。

githubの方も見てみると、

The description of the product a customer hears when making a purchase or when they cancel a subscription.

ということは購入時・キャンセル時にアレクサが話すようですね。以下のように設定してみます。ちょっと

挨拶パックを購入すると、フランス語、スペイン語、ヒンズー語など、様々な言語の挨拶を聞くことができます。ぜひご利用ください。

購入確認の説明

ツールチップには以下とあります。

Alexaコンパニオンアプリの購入後確認カードに表示される。商品の説明です。

githubはこう。

A description of the product that displays on the skill card in the Alexa app. Customers will see this.

購入後にアレクサアプリのほうに表示されるようですね。以下としました。

挨拶パックを購入しました。フランス語、スペイン語、ヒンズー語など、様々な言語の挨拶をお楽しみください。

確認

ではサンプルスキルを実際に動かしながらやってみましょう。念の為、買い切り型とサブスクリプション型の両方で確認します。

買い切り型

BUYの場合

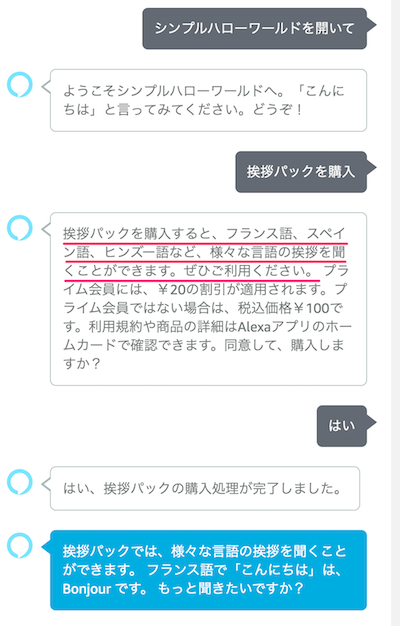
BUYの場合の会話の流れはこんな感じです。

f:id:kun432:20200314221716p:plain

購入前の説明で「購入プロンプト」が発話され、その後料金等の説明が行われていますね。購入後に発話されているのは「説明」と同じ内容ですが、ここはスキル内で実装されているので「説明」が自動的に呼び出されているわけではありませんのでご注意ください(ややこしい)。

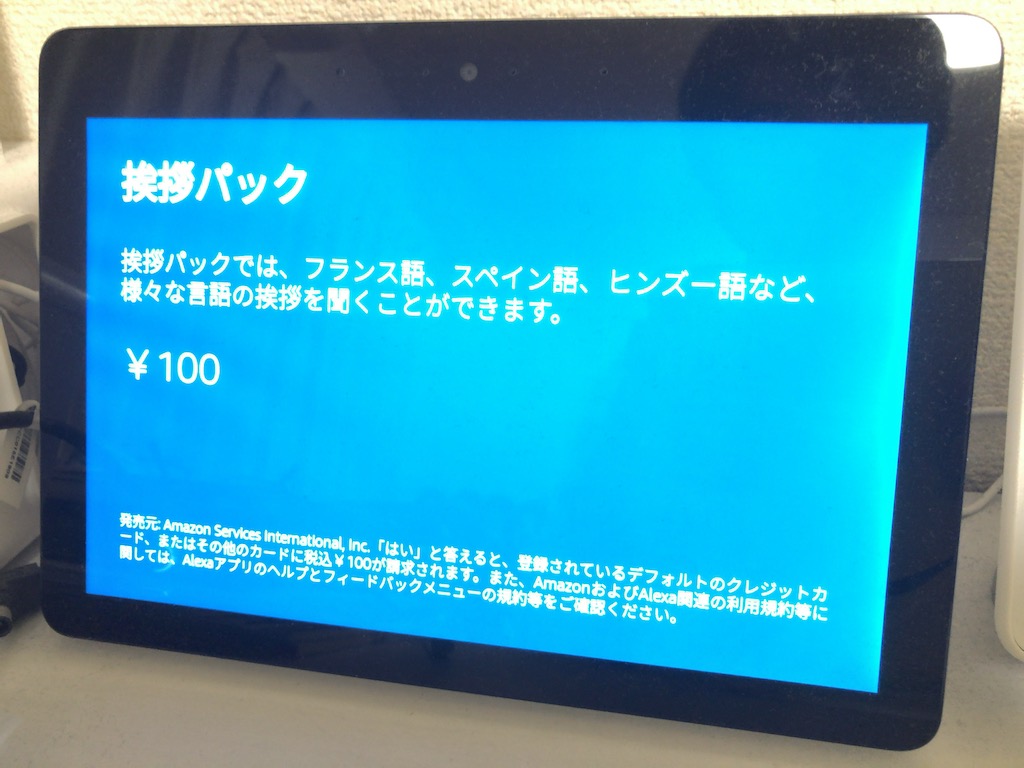
画面付きデバイスで実行した場合は「購入プロンプト」が発話されているところで以下のように表示されます。

f:id:kun432:20200314211454j:plain

ここで「詳細な説明」が画面に表示されるようです。

あと、Alexaアプリです。以前はアクティビティーに出ていたものがトップにでてくるようになっています。たぶんこれがスキルカードですね(引き続きアクティビティーにしかでないものもあるようです・・・わかりにくい)

f:id:kun432:20200314212355p:plain

ここで「購入確認の説明」が表示されるというわけですね。

CANCEL

キャンセルの場合です。

f:id:kun432:20200314213421p:plain:w400

キャンセルの場合は特に何も出ません。画面付きデバイスもアレクサアプリのカードなどにも特に商品に関する説明は表示されませんでした。

サブスクリプション

BUYの場合

f:id:kun432:20200314223052p:plain

おっと、サブスクリプションの場合は「購入プロンプト」が表示されずにいきなりサブスクリプションの説明に移るようです。

ただし、画面付きデバイスの場合は、買い切り型と同様に「詳細な説明」が表示されます。

f:id:kun432:20200314223921j:plain

アレクサアプリには特に何も表示されません。

CANCELの場合

f:id:kun432:20200314223356p:plain

キャンセルの場合、確認前に「購入プロンプト」が表示されるようです。画面付きデバイスやアレクサアプリのカード等には商品に関する説明は表示されませんでした。

UPSELLについて

サンプルコードではランダムでアップセルが呼び出されるように実装されています。該当のコードは以下です。

  return handlerInput.responseBuilder
    .addDirective({
      type: 'Connections.SendRequest',
      name: 'Upsell',
      payload: {
        InSkillProduct: {
          productId: greetingsPackProduct[0].productId,
        },
        upsellMessage,
      },
      token: 'correlationToken',
    })
    .getResponse();

アップセルの場合のみ、ディレクティブに商品説明を含めて送る形になっています。これは、アップセルの場合、商品説明後に「もっと知りたいですか?」というユーザへの意思確認を行った上で購入処理につなげるためです(これがないと自分で確認用のインテントを用意しないといけなくなる)。なので実際の購入処理では商品説明は行われません。

まとめ

正直、ちょっとよくわからない結果になりました。買い切り型とサブスクリプション型で商品説明の有無が異なる、かつ、BUYとCANCELでそれぞれ異なる、というのは少し解せない感じがします。コードも見てみたんですが、特に問題なさそうです。

CANCELの場合、返金処理を伴う買い切り型と解約申込後の月末に解約されるサブスクリプションではまあなんとなく理解できる部分もあるかなぁとは思いますが、BUYの場合はどちらでも商品に関する説明はあっていいと思うのですが・・・

ただ、公式のドキュメントを見ても分かる通り、購入処理中のメッセージもそれぞれ異なっているので、意図があってそうなってるのなのかもしれません。消費型はともかく、買い切り型・サブスクリプション型の違いも意識してテストはしておいたほうがいいかなという気はします。

ということで、スキル内商品の説明がどのように使われるか?のまとめでした。

カスタムスロットタイプのスキル間での共有を試してみた

2020/3/4追記 タイトルを少し変更しました

Alexa Developer Blogで紹介されていたこの記事を試してみました。

f:id:kun432:20200313132705p:plain

https://developer.amazon.com/en-US/blogs/alexa/alexa-skills-kit/2020/03/create-shared-slots-across-your-skills-to-optimize-productivity-and-customer-experience:text

ビルトインで用意されているスロットタイプで足りない場合、カスタムスロットタイプを使うことになるわけですが、似たようなスキルを作るとカスタムスロットタイプも作るわけで、作ることもそうですがメンテナンスするのが面倒です。そこを独立させてしまえばメンテが簡単になるわけですね。ということでやってみました。

いくつかやり方が紹介されてますが、動的エンティティはちょっと置いといて、以前からある「参照ベースのカタログ」を使う方法と今回発表された「スロットタイプ」を共有する方法を試してみたいと思います。

参照ベースのカタログ管理

公式のドキュメントはこちらです。

カタログは、データベースとまではいかないですが、リスト的なものを外部で管理するための仕組みです。ユースケースとして、今回のカスタムスロットタイプ値をスキルの外において、複数のスキルからそれを参照すれば、リストの管理が一元的にできて、スキルからは呼び出すだけということになるかと思います。

では早速やってみましょう。例としてLastNameJPという日本語の名字のカタログを作りたいと思います。現時点でカタログへのアクセスにはask-cliが必要ですので、必要な人はインストールしてください。

まず最初にカタログの定義を作成します。ask api create-model-catalogを使います。-nでカタログ名、-dでカタログの説明を記載します。ただしこの名前と説明はスキル内では必要ありません。

$ ask api create-model-catalog -n JP_LAST_NAME -d "日本人の典型的な名字です。"
{
  "catalogId": "amzn1.ask.interactionModel.catalog.xxxxxxxx-xxxx-xxxx-xxxx-xxxxxxxxxxxx"
}

すると、カタログIDが作成されます。この以降の作業はこのIDを使って操作を行います。

登録されているカタログの一覧を表示します。一覧を表示するには、ask api list-model-catalogsを使います。

$ ask api list-model-catalogs
{
  "catalogs": [
    {
      "catalogId": "amzn1.ask.interactionModel.catalog.xxxxxxxx-xxxx-xxxx-xxxx-xxxxxxxxxxxx",
      "name": "JP_LAST_NAME"
    }
  ],
  "isTruncated": false,
  "totalCount": 1
}

はい、先程登録したカタログが表示されました。ちなみにカタログはベンダーID、つまり、開発者アカウントごとに管理されます。

次にカタログのバージョンを作成します。カタログのデータは常にバージョンとひも付きます。つまり、新規作成するとバージョン1、更新するたびにインクリメントされていくというわけです。

以下のようなカタログデータをjp-last-name.jsonとして用意します。

{
  "values": 
  [
    {
        "id": "id1",
        "name": {
            "value": "佐藤"
        }
    },
    {
        "id": "id2",
        "name": {
            "value": "鈴木"
        }
    },
    {
        "id": "id3",
        "name": {
            "value": "高橋"
        }
    },
    {
        "id": "id4",
        "name": {
            "value": "田中"
        }
    },
    {
        "id": "id5",
        "name": {
            "value": "伊藤"
        }
    },
    {
        "id": "id6",
        "name": {
            "value": "渡辺"
        }
    },
    {
        "id": "id7",
        "name": {
            "value": "山本”
        }
    },
    {
        "id": "id8",
        "name": {
            "value": "中村"
        }
    },
    {
        "id": "id9",
        "name": {
            "value": "小林"
        }
    },
    {
        "id": "id10",
        "name": {
            "value": "加藤"
        }
    },
    {
        "id": "id11",
        "name": {
            "value": "吉田"
        }
    },
    {
        "id": "id12",
        "name": {
            "value": "山田"
        }
    }
]
}

そしてこのファイルをインターネット上でパブリックにアクセスできるところで公開します。今回はAmazon S3にアップロードしました。

そしてカタログバージョン用の定義ファイルを作ります。catalog.jsonとしました。この中でカタログデータファイルのURLを指定します。

{
  "type": "URL",
  "url": "https://xxxxxxxxx.s3-ap-northeast-1.amazonaws.com/jp-last-name.json"
}

ではいよいよバージョンを登録します。ask api create-model-catalog-versionを使います。

$ ask api create-model-catalog-version -c amzn1.ask.interactionModel.catalog.xxxxxxxx-xxxx-xxxx-xxxx-xxxxxxxxxxxx -f ./catalog.json
catalog version submitted
Please use the following command to track the to track the create version status
 get-model-catalog-update-status -c amzn1.ask.interactionModel.catalog.xxxxxxxx-xxxx-xxxx-xxxx-xxxxxxxxxxxx -u xxxxxxxx-xxxx-xxxx-xxxx-xxxxxxxxxxxx-Time-2020-03-08T15-01-19.600

このとき、更新リクエストIDというものが発行されるので、ask api get-model-catalog-update-statusで更新ID・カタログIDを渡すと、カタログバージョンの作成状況を確認できます。

$ ask api get-model-catalog-update-status -c amzn1.ask.interactionModel.catalog.xxxxxxxx-xxxx-xxxx-xxxx-xxxxxxxxxxxx -u xxxxxxxx-xxxx-xxxx-xxxx-xxxxxxxxxxxx-Time-2020-03-08T15-01-19.600
{
  "lastUpdateRequest": {
    "errors": [],
    "status": "SUCCEEDED",
    "version": "1"
  }
}

上記のようにバージョン番号が発行され、SUCCEEDEDになっていればOKです。

登録されたカタログバージョンを見てみます。ask api get-model-catalog-versionを使います。

$ ask api get-model-catalog-version -c amzn1.ask.interactionModel.catalog.xxxxxxxx-xxxx-xxxx-xxxx-xxxxxxxxxxxx --catalog-version 1
{
  "source": {
    "type": "URL",
    "url": "https://xxxxxxxxx.s3-ap-northeast-1.amazonaws.com/jp-last-name.json"
  },
  "version": "1"

バージョン1が登録されています。

では、スキルから使ってみましょう。今回はAlexa開発者コンソールでHello Worldスキルのテンプレートから新規にスキルを作成してやってみます。JSONエディターを開いてみると、以下のように何もスロットが設定されていませんね。

            "types": []

これを以下のように変更します。

            "types": [
                {
                    "name": "jpLastName",
                    "valueSupplier": {
                     "type": "CatalogValueSupplier",
                        "valueCatalog": {
                            "id": "amzn1.ask.interactionModel.catalog.xxxxxxxx-xxxx-xxxx-xxxx-xxxxxxxxxxxx",
                            "version": "1"
                        }
                    }
                }
            ]

nameがスキル内でのスロット名になります。valueSupplierにカタログの情報を入れていきます。カタログIDとバージョンですね。追加したらモデルを保存・ビルドします。ここ少し注意なんですが、保存・ビルドを行うタイミングでIDが空になって姉妹エラーになることがあります。その場合はもう一度IDを入力して保存・ビルドしてください。

では、対話モデルを設定して実際に使ってみましょう。

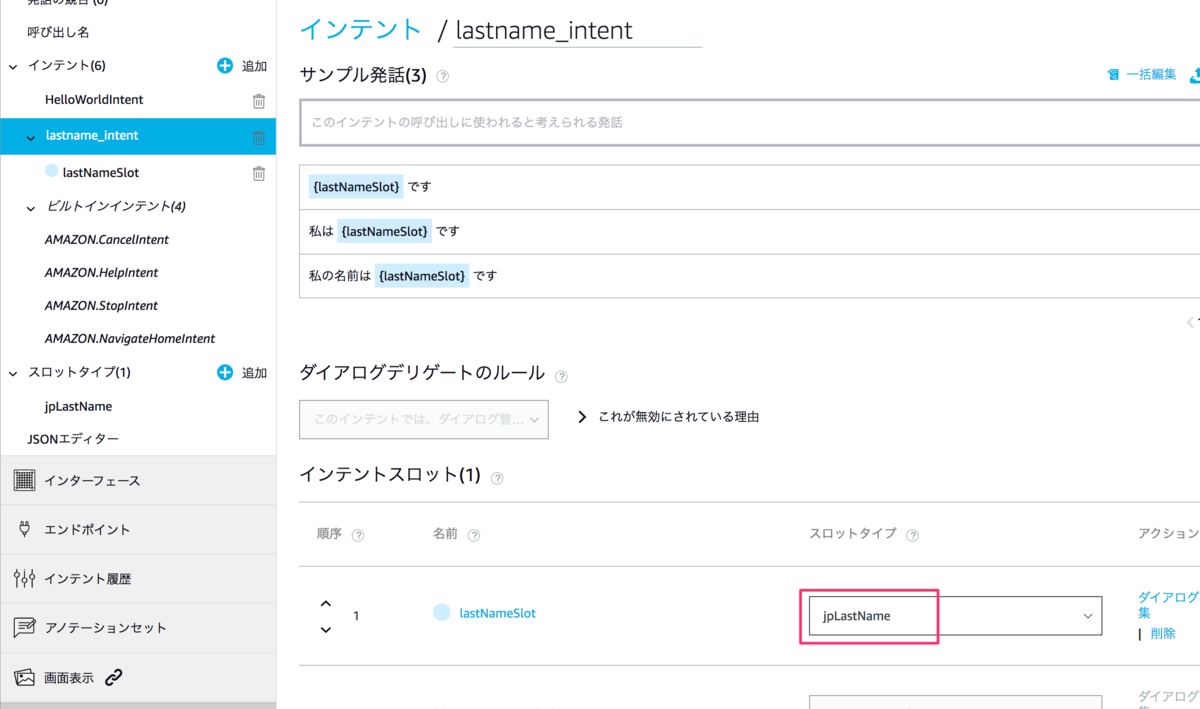
lastname_intentというインテントを作成し、サンプル発話とスロットを作成し、先程JSONエディターで登録したスロットタイプを選択します。再度、モデルの保存とビルドを行っておきます。

f:id:kun432:20200313003629p:plain

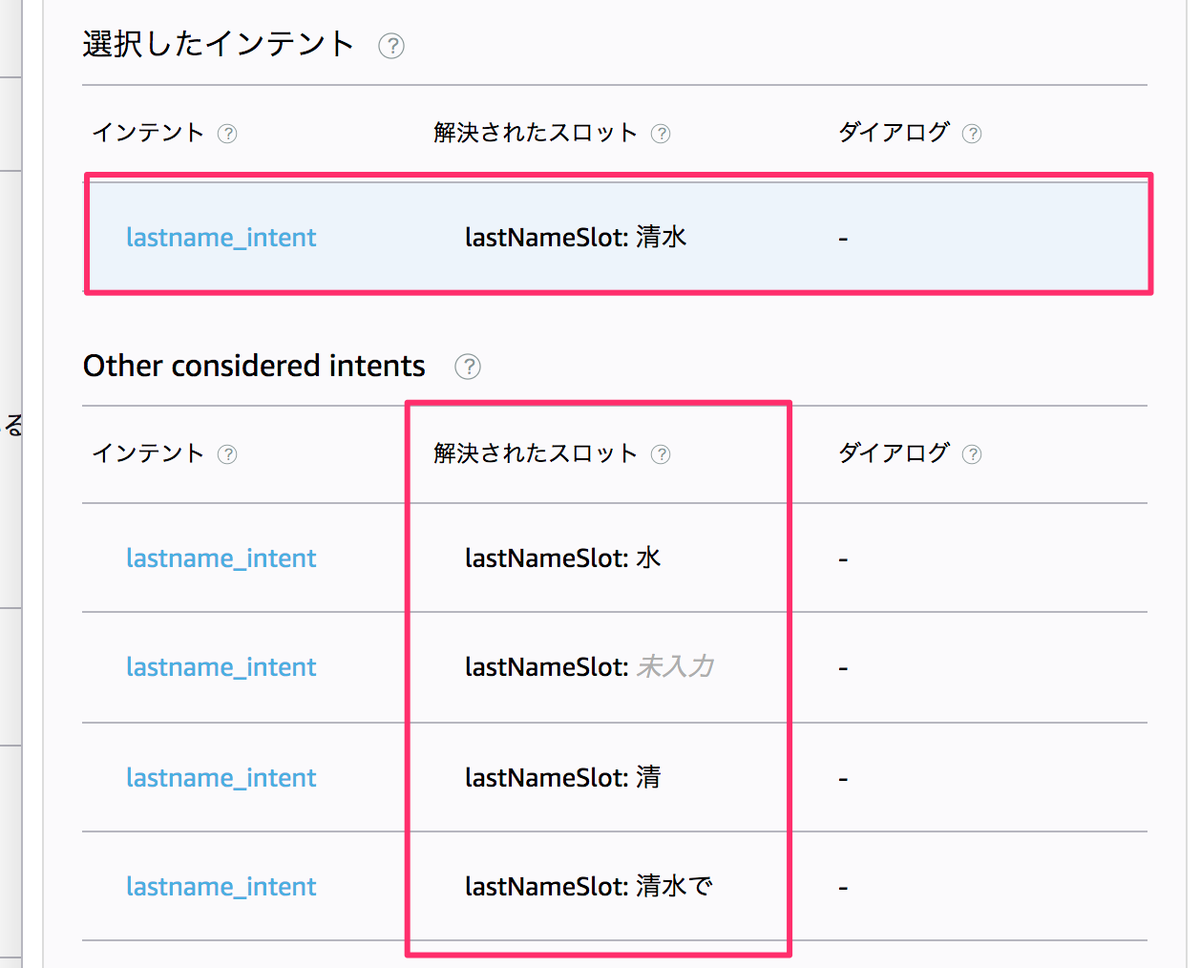
ではテストしてみましょう。実際のスキルのテストではなく、発話プロファイラを使ってみたいと思います。右上の「モデルの評価」をクリックして、発話プロファイラにサンプル発話を入力してみます。まずはスロットタイプにに登録されている「佐藤」さんから。

f:id:kun432:20200313004025p:plain

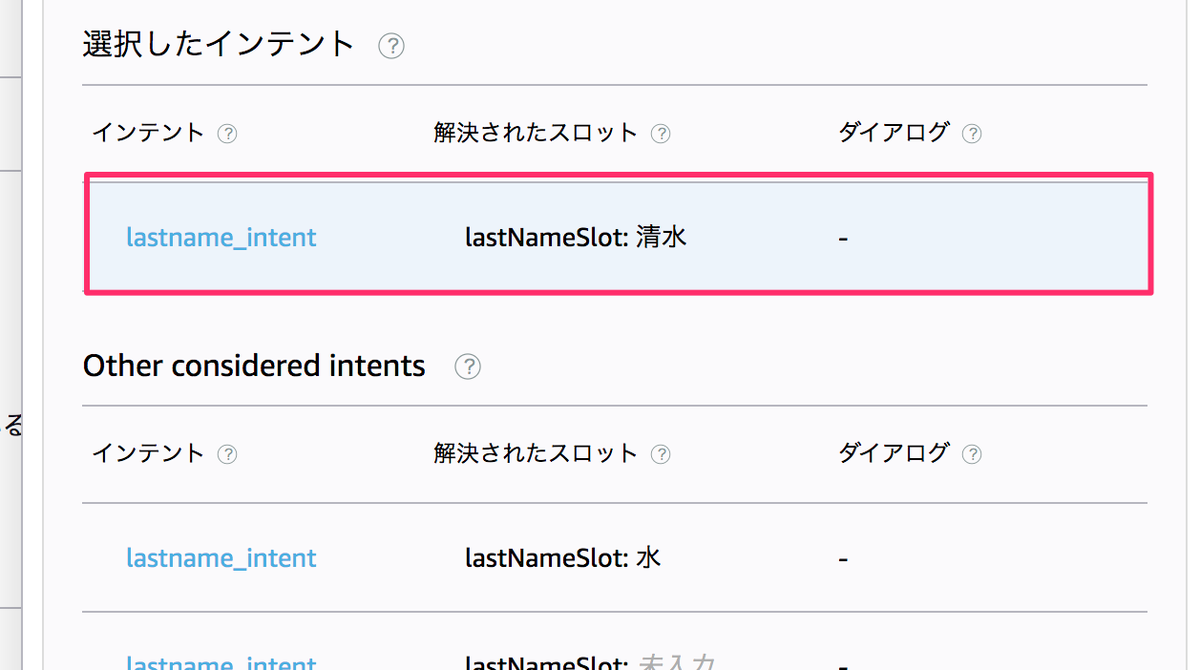
はい、きちんとスロットとして認識していますね。次はスロットタイプに登録されていない「清水」さんで。

f:id:kun432:20200314005252p:plain

こちらもスロットとして認識はしていますが、下の方を見てください。

f:id:kun432:20200313004644p:plain

この違いがわかりますか?カスタムスロット値として登録しておいた場合は、インテント・スロットの認識が一つしかないのに対して、カスタムスロット値が登録されていない値の場合は他の候補が表示されます。つまり、カタログとして登録したカスタムスロットをきちんと認識していると考えられますね。

このようにして、カスタムスロットタイプをカタログとしてスキルとは別の場所に登録しておくことで、スキルとは別に管理ができる、つまり、複数のスキルで共有することができるというわけですね。

実際にはカタログのデータはバージョンで管理をします。スキル内からもバージョンを指定する必要があるため、カタログのデータを更新すれば勝手に変わる、というわけではなく、スキル側でもバージョンを更新して対話モデルの再ビルドが必要になります。ただ現在はLive Updateにより、カスタムスロット値の更新程度であれば、審査に時間がかかることなく更新が可能になっているので、タイムリーに対応ができると思います。

カスタムスロット値の共有

先ほど紹介した通り、カタログを使ってカスタムスロットを登録しておけばスキル間での共有が可能です。じゃあこっちは何なのか?というと、実はこちらも中身的にはカタログと似たような仕組みになっていて、ただし、明確にカスタムスロット用として新たに追加されたもののようです。では早速見ていきましょう。

こちらもask-cliを使いますが、ask-cli-1.7.23以降になります。で、微妙にコマンドが違います。

まず、同じようにスロットタイプの定義を作成します。ask api create-model-slot-typeを使います。

$ ask api create-model-slot-type -n "JP_LAST_NAME2" -d "日本の典型的な名字です"
{
  "slotType": {
    "id": "amzn1.ask.interactionModel.slotType.xxxxxxxx-xxxx-xxxx-xxxx-xxxxxxxxxxxx"
  }
}

カタログとは別のスロットタイプIDが発行されます。スロットタイプの一覧を取得するask api list-model-slot-typesを実行します。

$ ask api list-model-slot-types
{
  "slotTypes": [
    {
      "_links": {
        "self": {
          "href": "/v1/skills/api/custom/interactionModel/slotTypes/amzn1.ask.interactionModel.slotType.xxxxxxxx-xxxx-xxxx-xxxx-xxxxxxxxxxxx"
        }
      },
      "description": "日本の典型的な名字です",
      "id": "amzn1.ask.interactionModel.slotType.xxxxxxxx-xxxx-xxxx-xxxx-xxxxxxxxxxxx",
      "name": "JP_LAST_NAME2"
    }
  ]
}

はい、登録されていますね。次に

スロット単体での確認はask api get-model-slot-type を使います。このとき、スロットタイプIDは-tで指定します。

$ ask api get-model-slot-type -t amzn1.ask.interactionModel.slotType.xxxxxxxx-xxxx-xxxx-xxxx-xxxxxxxxxxxx
{
  "slotType": {
    "description": "日本の典型的な名字です",
    "name": "JP_LAST_NAME2"
  }
}

ではスロットタイプ値を登録します。カタログの場合はファイルをインターネット上に公開してURLを指定する形でした。スロットタイプの場合も同じことができますが、こちらはローカルのファイルで登録することもできます。

以下のようなJSONファイルを用意します。

{
      "valueSupplier": {
        "type": "InlineValueSupplier",
    "values": [
      {
          "id": "id1",
          "name": {
              "value": "佐藤"
          }
      },
      {
          "id": "id2",
          "name": {
              "value": "鈴木"
          }
      },
      {
          "id": "id3",
          "name": {
              "value": "高橋"
          }
      },
      {
          "id": "id4",
          "name": {
              "value": "田中"
          }
      },
      {
          "id": "id5",
          "name": {
              "value": "伊藤"
          }
      },
      {
          "id": "id6",
          "name": {
              "value": "渡辺"
          }
      },
      {
          "id": "id7",
          "name": {
              "value": "山本"
          }
      },
      {
          "id": "id8",
          "name": {
              "value": "中村"
          }
      },
      {
          "id": "id9",
          "name": {
              "value": "小林"
          }
      },
      {
          "id": "id10",
          "name": {
              "value": "加藤"
          }
      },
      {
          "id": "id11",
          "name": {
              "value": "吉田"
          }
      },
      {
          "id": "id12",
          "name": {
              "value": "山田"
          }
      }
    ]
      }
}

上記にあるInlineValueSupplierというのがファイルの中に書いているという意味になります。それではバージョンを作成します。バージョンの作成はask api create-model-slot-type-versionを使います。-t でスロットタイプID、-fで上記のJSONファイルのパスを指定します。

$ ask api create-model-slot-type-version -t amzn1.ask.interactionModel.slotType.xxxxxxxx-xxxx-xxxx-xxxx-xxxxxxxxxxxx -f ./jp-last-name-slot.json
Slot type version submitted.
Please use the following command to track the status
 ask api get-model-slot-type-update-status -t amzn1.ask.interactionModel.slotType.xxxxxxxx-xxxx-xxxx-xxxx-xxxxxxxxxxxx -u xxxxxxxx-xxxx-xxxx-xxxx-xxxxxxxxxxxx

ask api get-model-slot-type-update-statusで更新状況を見てみましょう。

$ ask api get-model-slot-type-update-status -t amzn1.ask.interactionModel.slotType.xxxxxxxx-xxxx-xxxx-xxxx-xxxxxxxxxxxx -u xxxxxxxx-xxxx-xxxx-xxxx-xxxxxxxxxxxx
  "updateRequest": {
    "status": "SUCCEEDED",
    "version": "1"
  }
}

バージョン1が発行されました。ask api get-model-slot-type-versionでバージョンの内容を取得してみます。

$ ask api get-model-slot-type-version -t amzn1.ask.interactionModel.slotType.xxxxxxxx-xxxx-xxxx-xxxx-xxxxxxxxxxxx --slot-type-version 1
{
  "slotType": {
    "id": "amzn1.ask.interactionModel.slotType.xxxxxxxx-xxxx-xxxx-xxxx-xxxxxxxxxxxx",
    "definition": {
      "valueSupplier": {
        "type": "InlineValueSupplier",
        "values": [
          {
            "id": "id1",
            "name": {
              "value": "佐藤"
            }
          },
          {
            "id": "id2",
            "name": {
              "value": "鈴木"
            }
          },
          {
            "id": "id3",
            "name": {
              "value": "高橋"
            }
          },
          {
            "id": "id4",
            "name": {
              "value": "田中"
            }
          },
          {
            "id": "id5",
            "name": {
              "value": "伊藤"
            }
          },
          {
            "id": "id6",
            "name": {
              "value": "渡辺"
            }
          },
          {
            "id": "id7",
            "name": {
              "value": "山本"
            }
          },
          {
            "id": "id8",
            "name": {
              "value": "中村"
            }
          },
          {
            "id": "id9",
            "name": {
              "value": "小林"
            }
          },
          {
            "id": "id10",
            "name": {
              "value": "加藤"
            }
          },
          {
            "id": "id11",
            "name": {
              "value": "吉田"
            }
          },
          {
            "id": "id12",
            "name": {
              "value": "山田"
            }
          }
        ]
      }
    },
    "version": "1"
  }
}

はい、これでスロットタイプが登録できました。

では、これをスロットから使います・・・といいたいところですが、ドキュメントにはこの指定方法が載っていません・・・

で、いろいろ調べたところ、以下にサンプルがありました。

これを見る限り、以下のように登録するようです。

   "intents": [
        {
          "name": "IngredientIntent",
          "slots": [
            {
              "name": "Ingredient",
              "slotTypeReference": {
                "id": "amzn1.ask.interactionModel.slotType.xxxxxxxx-xxxx-xxxx-xxxx-xxxxxxxxxxxx",
                "version": "1"
              }
            }
          ],
          "samples": [
            "Add {Ingredient} to my shopping list",
            "Add {Ingredient} to my ingredient list",
            "Add {Ingredient} to my list"
          ]
        }
      ],

カタログの場合は、types、つまり対話モデルの中でスロットタイプを指すオブジェクトになっていましたが、スロットタイプの場合はインテントに紐付いたスロットとして登録するようです。

では実際にスキル内から使ってみましょうということで、同じようにJSONエディターに登録してみたのですが、何度やっても正しく反映されません・・・エラーも出ないので記載は多分あっているのではないか?と思うのですが、こればっかりはわかりようがないので情報が出てくるのを待ちたいと思います。

まとめ

ということで、カスタムスロットをスキル間で共有することができる「カタログ」に関連した機能のご紹介でした。カスタムスロットを共有できるのはパッと聞いただけだと便利そうと思う反面、コマンドもしくはAPIでしかできないのでとても面倒です。

じゃあこれ誰が嬉しいのか?というと、一番嬉しいのはSMAPIを使う人、端的に言うと、VoiceflowとかVoiceAppsとかみたいなスキル作成サービスを作っているところだと思います。

Alexaスキル管理API(SMAPI)は、Alexaスキル管理タスクをプログラムで実行できるRESTful HTTPインターフェースを提供します。スキル管理タスクには、スキルの新規作成や対話モデルの更新などがあります。APIは、Login with Amazonを使用して呼び出し元を認証します。認証された開発者はすべて、ユーザーに代わってAlexaスキルの作成や更新を行うツールやサービスの開発ができるようになります。ASK CLIは、そうしたツールの1つです。

VoiceflowのUI上で作ったスキルをAlexa開発者コンソールにアップロードする際、おそらくこの仕組を使っていると思われるのですが、ここにカスタムスロット値をスキルとは別に管理できるような機能が提供された、ということだと考えてます。

実はこれは結構インパクトあるのではないかと考えています。というのも、Voiceflowでもカスタムスロットを作ることはできますが、すべてGUIでの登録、かつ、CSV一括インポートみたいな機能はありません。小さなスキルでは問題ないですが、カスタムスロットの値が多くなってきたり、かつ、スキルごとにこれを作り直したり、メンテナンスしたり、となってくるとかなり辛いんですね・・・なのでこの機能が取り込まれると非常に効率的になるではないかなと思います。

それはそれとして、もちろんAlexa開発者コンソールでも使えるようになるのを期待して待ちたいと思います。