※タイトル、わかりにくかったので変えました。
VoiceflowのGoogle Integrationが、これまでのDialogflowからActions Builderに変わったので、改めてActions Builderをおさらいしてます。
Actions Builderでのアクション作成は以下辺りを参考にすると良いと思います。
で、一通りやった後で、もうちょっとコードベースで管理したいなーということで、gactions commad-line-toolを使ってみました。
以下のquick start guideに従ってやってみます。
事前準備
多分こんな感じ。
- Googleアカウントを持っていること
- Actions on Googleにログインして、利用規約に同意しておく。
- Google Cloud Platform(GCP)にログインして、利用規約に同意しておく。
- 初めての場合は請求アカウントの設定をしておく必要があるかもしれません。
Googleアカウントをお持ちであれば、同じアカウントで使えると思います。利用規約に同意しておく必要があるというのは、なんとなく過去の個人的な経験によるもの(都度都度やる、だとハマる場合があった)。請求アカウントの設定も含めて、私の場合は設定済なので、初めての場合にどうなるかはわかりません。ご了承ください。
インストール
基本的ばよいですが、homebrewで入れれるものはそっちを使おうと思います。
必要なものは以下。
- Node.js
- Firebase CLI
- gactions commad-line-tool
Firebase CLIは、ドキュメントを読む限り、Interactive Canvasのホスティングを使う or 手動でCloud Functionsを使う場合は必要、という感じなので必須ではなさそうだけど、quick start guideでは後で出てくるコードのサンプルがInteractive Canvasを使っているので、入れておきます。
では順に。Node.jsは入ってます。
$ node -v
v12.18.4
Firebase CLI/gactions commad-line-toolは両方ともMacならhomebrewでインストールできます。
$ brew install gactions firebase-cli
初期設定です。Firebase CLIから。firebase loginでログインします。
$ firebase login
cliの利用やエラー等をGoogleに送信するかを聞かれます。とりあえず"Yes"で。変えたい場合はfirebase logoutして、再度firebase loginすれば同じことを聞かれるので変更できます。
i  Firebase optionally collects CLI usage and error reporting information to help improve our products. Data is collected in accordance with Google's privacy policy (https://policies.google.com/privacy) and is not used to identify you.

? Allow Firebase to collect CLI usage and error reporting information? Yes
以下のようなメッセージが表示され、ブラウザが立ち上がりますので、ログインします。
i  To change your data collection preference at any time, run `firebase logout` and log in again.

Visit this URL on this device to log in:
https://accounts.google.com/o/oauth2/auth?...(snip)
権限の許可を求められますので「許可」します。
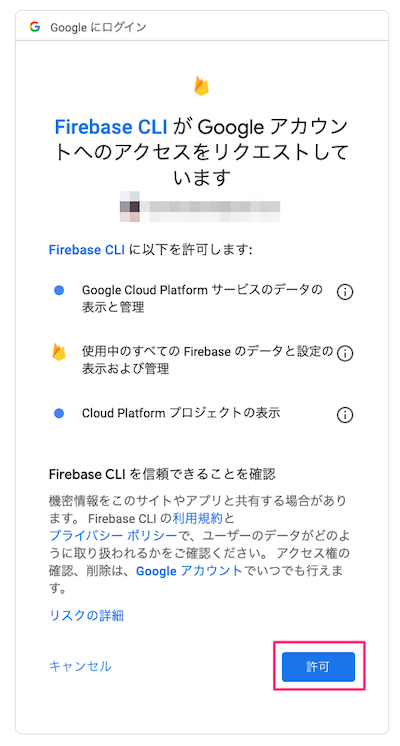
以下のように表示されればOKです。

ターミナルにもログイン成功が表示されると思います。
✔ Success! Logged in as *****
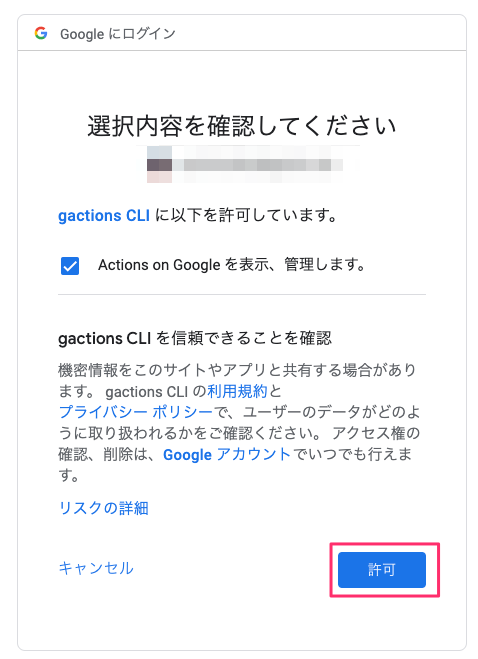
次に、gactions cliです。こちらも同様にgacions loginでログインします。
$ gactions login
同様にブラウザが立ち上がりますので、ログインすると、以下のような画面が表示されるので、「許可」をクリック。

さらに「許可」をクリック。
以下のように表示されればOKです。
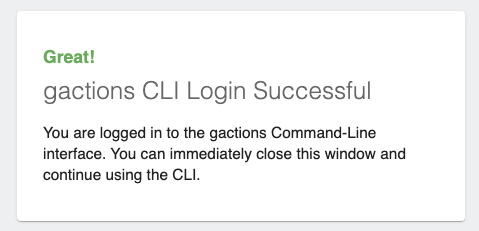
ターミナルでも成功が表示されます。
✔ Done. Successfully logged in.
プロジェクトの作成(AoG/GCP)
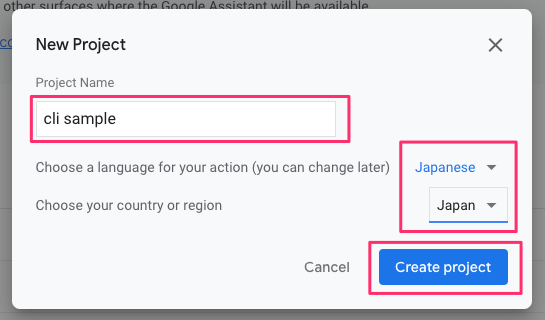
Actions on Googleのプロジェクト新規作成はcliではできませんので、Actions Consoleから行います。 https://console.actions.google.com/ にアクセスしてログイン、"New Project"をクリック。

プロジェクト名、言語、国を選択して"Create Project"をクリック。
プロジェクトの種類は"Custom"を選択。"Next"をクリック。

プロジェクトの開始方法として、ブランクなプロジェクトから始めるか、テンプレートを使うかを聞かれます。"Blank project"を選択して、"Start building"をクリック。

プロジェクトが作成されました。
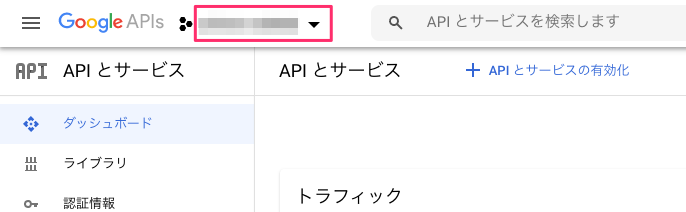
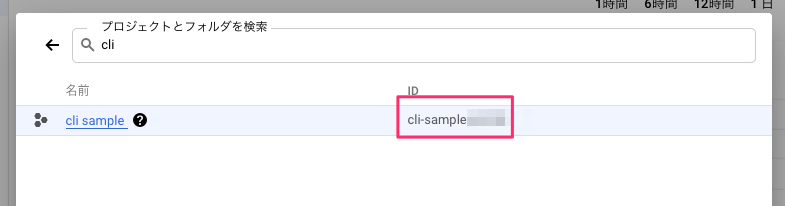
次に、GCP側で作成したプロジェクトのAPIを有効化する必要があります。https://console.developers.google.com/ にアクセスして、作成したプロジェクトを開きます。左上のプロジェクト名をクリック。
プロジェクトの一覧から先ほど作成したプロジェクトを検索して開きます。

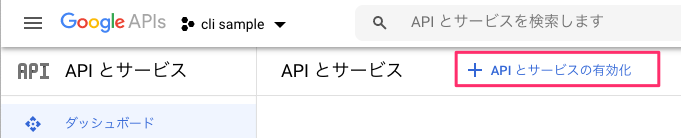
プロジェクトが開いたら、"APIとサービスの有効化"をクリックします。
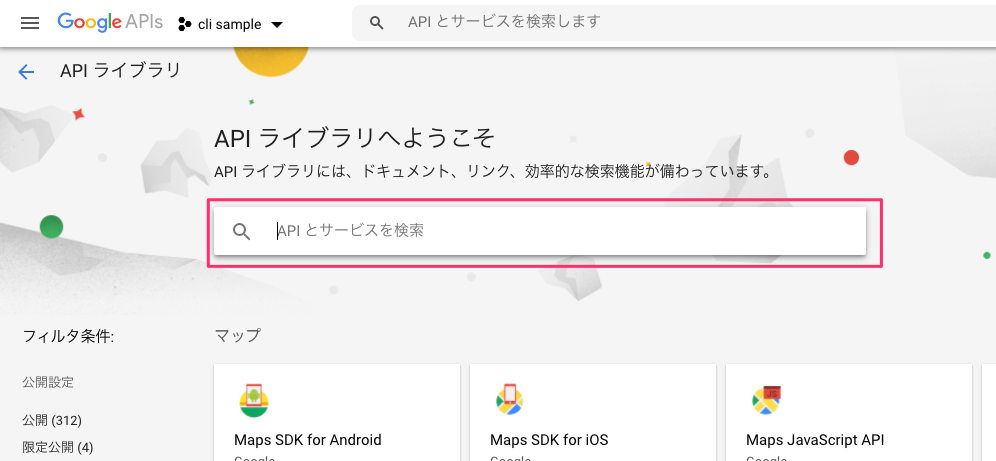
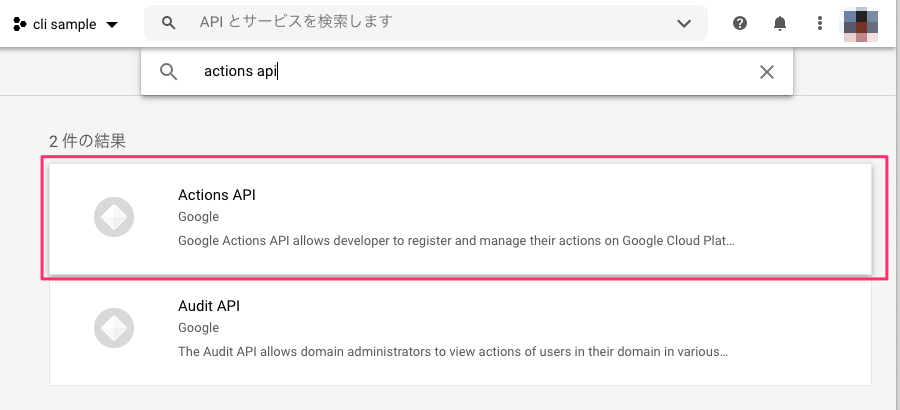
APIの検索画面が表示されるので"Actions API"を検索します。
"Actions API"をクリック。
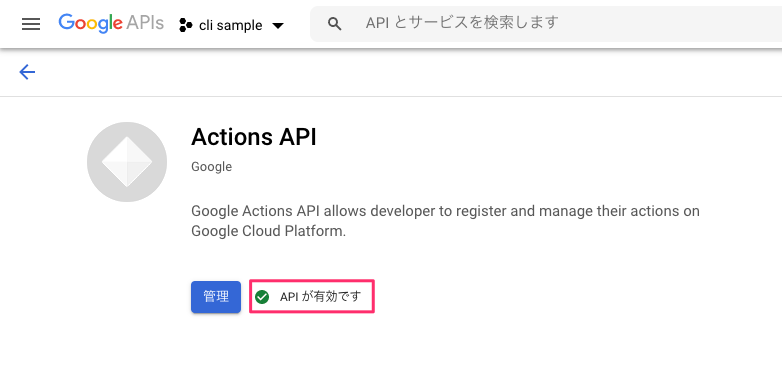
APIが「有効」になっていることを確認します。「無効」になっている場合は「有効化」します。
これで準備完了です。
プロジェクトのコードの初期化(gacions-cli)
さてここからがコードです。quick start guideでは、Interactive Canvasのサンプルを使ってローカルのプロジェクトを初期化しているようです。一旦例に習ってやってみましょう。
$ gactions init interactive-canvas --dest interactive-canvas-sample
Writing sample files for interactive-canvas to interactive-canvas-sample
✔ Done. Please checkout the following documentation - https://developers.google.com/assistant/conversational/build on the next steps on how to get started.
interactive-canvas-sampleというディレクトリができているので移動します。
$ cd interactive-canvas-sample
ファイル・ディレクトリの構成はこんな感じになっていました。サンプルからのコピーなので、ミニマムな状態からやる場合はまた違うんだと思います。
$ tree
.
├── CONTRIBUTING.md
├── LICENSE
├── README.md
├── firebase.json
├── package.json
├── public
│   ├── css
│   │   └── main.css
│   ├── index.html
│   ├── js
│   │   ├── action.js
│   │   ├── log.js
│   │   ├── main.js
│   │   └── scene.js
│   ├── restart_game_btn_disabled.png
│   ├── restart_game_btn_enabled.png
│   └── triangle.svg
└── sdk
    ├── actions
    │   └── actions.yaml
    ├── custom
    │   ├── global
    │   │   ├── actions.intent.CANCEL.yaml
    │   │   ├── actions.intent.MAIN.yaml
    │   │   ├── actions.intent.NO_INPUT_1.yaml
    │   │   ├── actions.intent.NO_INPUT_2.yaml
    │   │   ├── actions.intent.NO_INPUT_FINAL.yaml
    │   │   ├── actions.intent.NO_MATCH_1.yaml
    │   │   ├── actions.intent.NO_MATCH_2.yaml
    │   │   ├── actions.intent.NO_MATCH_FINAL.yaml
    │   │   └── actions.intent.PLAY_GAME.yaml
    │   ├── intents
    │   │   ├── change_color.yaml
    │   │   ├── instructions.yaml
    │   │   ├── restart.yaml
    │   │   ├── start_spin.yaml
    │   │   └── stop_spin.yaml
    │   ├── scenes
    │   │   └── Game.yaml
    │   └── types
    │       └── color.yaml
    ├── manifest.yaml
    ├── settings
    │   └── settings.yaml
    └── webhooks
        ├── ActionsOnGoogleFulfillment
        │   ├── index.js
        │   └── package.json
        └── ActionsOnGoogleFulfillment.yaml

13 directories, 36 files
sdk/settings/settings.yamlを開きます。
$ vi sdk/settings/settings.yaml
settings.yamlにプロジェクトの設定がいろいろあるようです。defaultLocaleとか見てると、AoG側でプロジェクト作成した場合とここを合わせないといけない気がしますね・・・
category: GAMES_AND_TRIVIA
defaultLocale: en
localizedSettings:
  developerEmail:
  developerName:
  displayName: Interactive canvas sample
  fullDescription:
  privacyPolicyUrl:
  pronunciation: Interactive canvas sample
  shortDescription:
  smallLogoImage:
  termsOfServiceUrl:
projectId: <PROJECT_ID>
usesInteractiveCanvas: true
とりあえずはあまり気にせず、AoG/GCPとの紐付けだけ行いましょう。projectId: <PROJECT_ID>の"<PROJECT_ID>"にプロジェクトIDを入れて保存します。プロジェクトIDはGCPの画面で出てきたこれのことです。
ちなみに、AoG側でも右上の"︙"から"Project settings"を開けば確認できます。
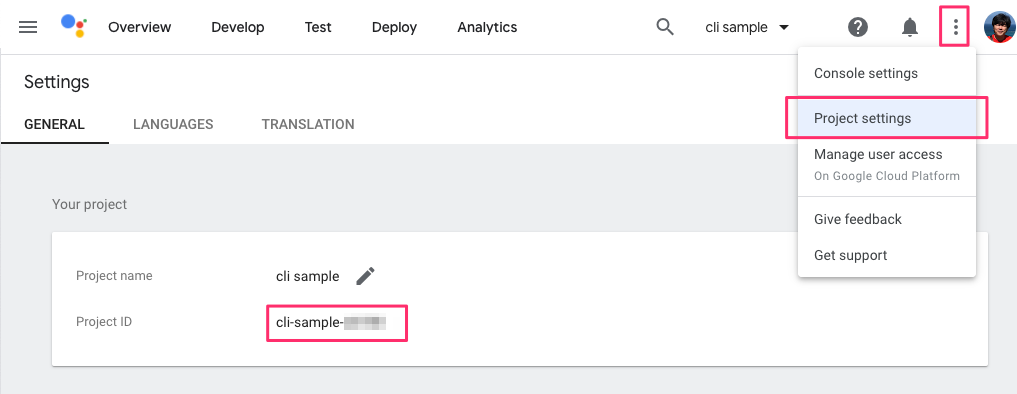
今回のプロジェクトはcli-sample-xxxxxとなっていましたので、それを設定しておきます。
projectId: cli-sample-xxxxx
コードのデプロイ
ではデプロイします。サンプルコードはInteractive CanvasでFirebaseのhostingを使っているので、まずFirebaseから。
$ firebase deploy --project cli-sample-xxxxx --only hosting

=== Deploying to 'cli-sample-xxxxx'...

i  deploying hosting
i  hosting[cli-sample-xxxxx]: beginning deploy...
i  hosting[cli-sample-xxxxx]: found 9 files in public
✔  hosting[cli-sample-xxxxx]: file upload complete
i  hosting[cli-sample-xxxxx]: finalizing version...
✔  hosting[cli-sample-xxxxx]: version finalized
i  hosting[cli-sample-xxxxx]: releasing new version...
✔  hosting[cli-sample-xxxxx]: release complete

✔  Deploy complete!

Project Console: https://console.firebase.google.com/project/cli-sample-xxxxx/overview
Hosting URL: https://cli-sample-xxxxx.web.app
デプロイされました。最後に表示されるURLがInteractive CanvasのウェブアプリケーションのURLになります。アクセスするとこんな感じです。

次にgactions-cliです。プロジェクトディレクトリの下にあるsdkディレクトリに移動してデプロイします。
$ cd sdk
$ gactions push
いろいろwarningが出ますが、現時点では無視して良さそうです。"Done"となっていればOKです。
Pushing files in the project "cli-sample-xxxxx" to Actions Console. This may take a few minutes.
Sending configuration files...
Sending resources...
Waiting for server to respond...
[WARNING] Server found validation issues (however, your files were still pushed):
  Locale  Validation Result
  en      Short description is required
  en      Long description is required
  en      Small square image is required
  en      Publisher email is required
  en      Developer name is required
  en      Privacy URL is required
  en      Could not reserve your pronunciation 'Interactive canvas sample' because: Your display name's pronunciation is already reserved by another Action.
✔ Done. Files were pushed to Actions Console, and you can now view your project with this URL: https://console.actions.google.com/project/cli-sample-xxxxx/overview. If you want to test your changes, run "gactions deploy preview", or navigate to the Test section in the Console.
ではテストシミュレータで確認してみましょう。sdkディレクトリからgactions deploy previewします。
$ gactions deploy preview

Deploying files in the project "cli-sample-xxxxx" to Actions Console for preview. This may take a few minutes.
Sending configuration files...
Sending resources...
Waiting for server to respond. It could take up to 1 minute if your cloud function needs to be redeployed.
[ERROR] Server did not return HTTP 200.
{
  "error": {
    "code": 403,
    "message": "Asset 'webhooks/ActionsOnGoogleFulfillment' cannot be deployed. [Cloud Functions API has not been used in project XXXXXXXXXXXX before or it is disabled. Enable it by visiting https://console.developers.google.com/apis/api/cloudfunctions.googleapis.com/overview?project=XXXXXXXXXXXX then retry. If you enabled this API recently, wait a few minutes for the action to propagate to our systems and retry.]"
  }
}
おっと、エラーになってしまいました・・・。Cloud Functions APIも有効化しておかないといけないようですね。エラーメッセージに表示されているURLにアクセスして、Cloud Functions APIを有効化します。

再度gactions deploy previewします。
$ gactions deploy preview
Deploying files in the project "cli-sample-xxxxx" to Actions Console for preview. This may take a few minutes.
Sending configuration files...
Sending resources...
Waiting for server to respond. It could take up to 1 minute if your cloud function needs to be redeployed.
[ERROR] Server did not return HTTP 200.
{
  "error": {
    "code": 400,
    "message": "Asset 'webhooks/ActionsOnGoogleFulfillment' cannot be deployed. [Failed to initialize region (action ID: XXXXXXXXXXXX): Function deployment failed because the billing account is not available.]"
  }
}
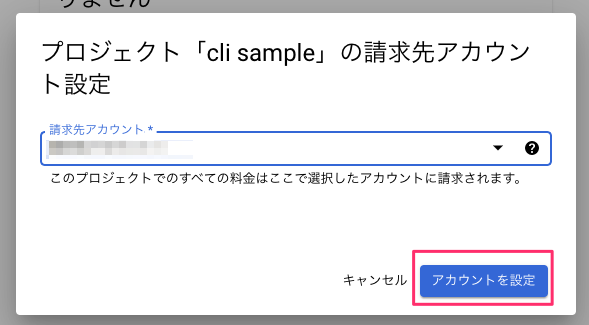
おっと、こんどはプロジェクトの請求アカウントが紐付けられていませんでした・・・GCPのプロジェクト画面を開いて、メニューから「お支払い」をクリックします。

プロジェクトに請求アカウントの設定が行われていませんので、「請求先アカウントをリンク」をクリックします。

請求先アカウントを検索して、紐付けます。

では再々度、gactions deploy previewしますが、再びエラー・・・Cloud Build APIの有効も必要と・・・
$ gactions deploy preview
Deploying files in the project "cli-sample-xxxxx" to Actions Console for preview. This may take a few minutes.
Sending configuration files...
Sending resources...
Waiting for server to respond. It could take up to 1 minute if your cloud function needs to be redeployed.
[ERROR] Server did not return HTTP 200.
{
  "error": {
    "code": 403,
    "message": "Asset 'webhooks/ActionsOnGoogleFulfillment' cannot be deployed. [Build failed: Cloud Build API has not been used in project XXXXXXXXXXXX before or it is disabled. Enable it by visiting https://console.developers.google.com/apis/api/cloudbuild.googleapis.com/overview?project=XXXXXXXXXXXX then retry. If you enabled this API recently, wait a few minutes for the action to propagate to our systems and retry.]"
  }
}
同じようにURLにアクセスして、Cloud Build APIを有効化します。

今度こそ・・・・gactions deploy previewします!
$ gactions deploy preview

Deploying files in the project "cli-sample-xxxxx" to Actions Console for preview. This may take a few minutes.
Sending configuration files...
Sending resources...
Waiting for server to respond. It could take up to 1 minute if your cloud function needs to be redeployed.
[WARNING] Server found validation issues (however, your files were still pushed):
  Locale  Validation Result
  en      Short description is required
  en      Long description is required
  en      Small square image is required
  en      Publisher email is required
  en      Developer name is required
  en      Privacy URL is required
  en      Could not reserve your pronunciation 'Interactive canvas sample' because: Your display name's pronunciation is already reserved by another Action.
✔ Done. You can now test your changes in Simulator with this URL: http://console.actions.google.com/project/cli-sample-d3709/simulator?disableAutoPreview
いけたー。表示されたURLにアクセスして、テストを実行します。
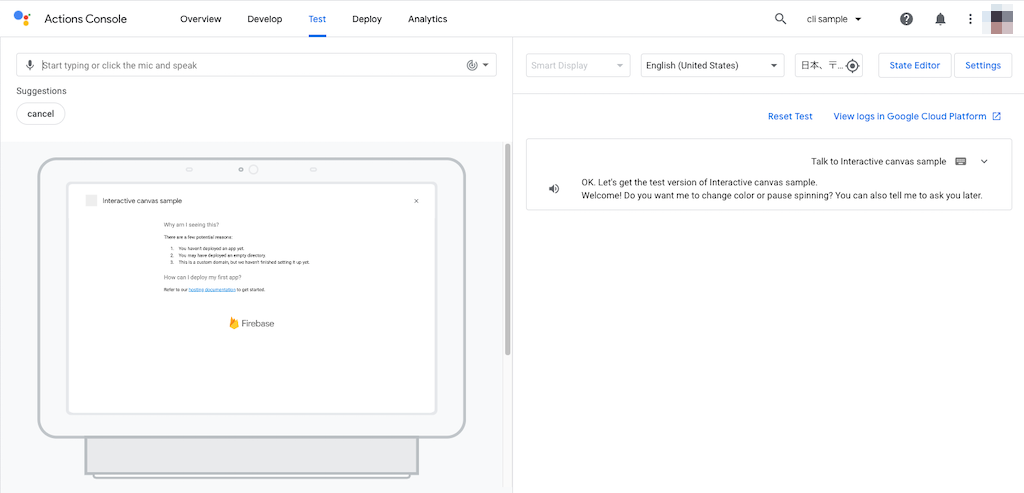
Interactive Canvasの画面表示がおかしいですね・・・拡大してみるとこんな感じ。

うーん、なんかそもそもイケてない感じですね。ということで調べてみると、webhooks/ActionsOnGoogleFulfillment/index.jsにこんなものが。
const CANVAS_URL = 'https://PROJECT_ID.web.app';
ここを書き換えないといけないですね(quick start guideにはどこにも書いてない・・・)
const CANVAS_URL = 'https://cli-sample-xxxxx.web.app';
変更後に再度gactions deploy preview。gactions pushとgactions deployの違いがまだわかっていませんが・・・
$ gactions deploy preview
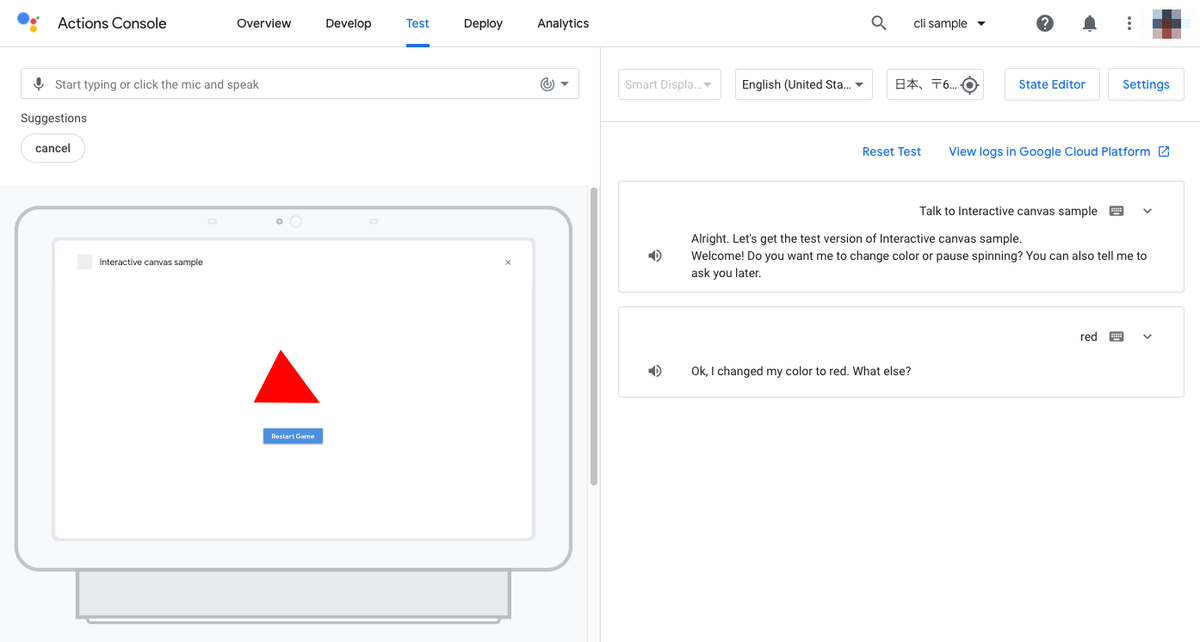
テストシミュレータにアクセスして、ちゃんとできていることを確認できました!
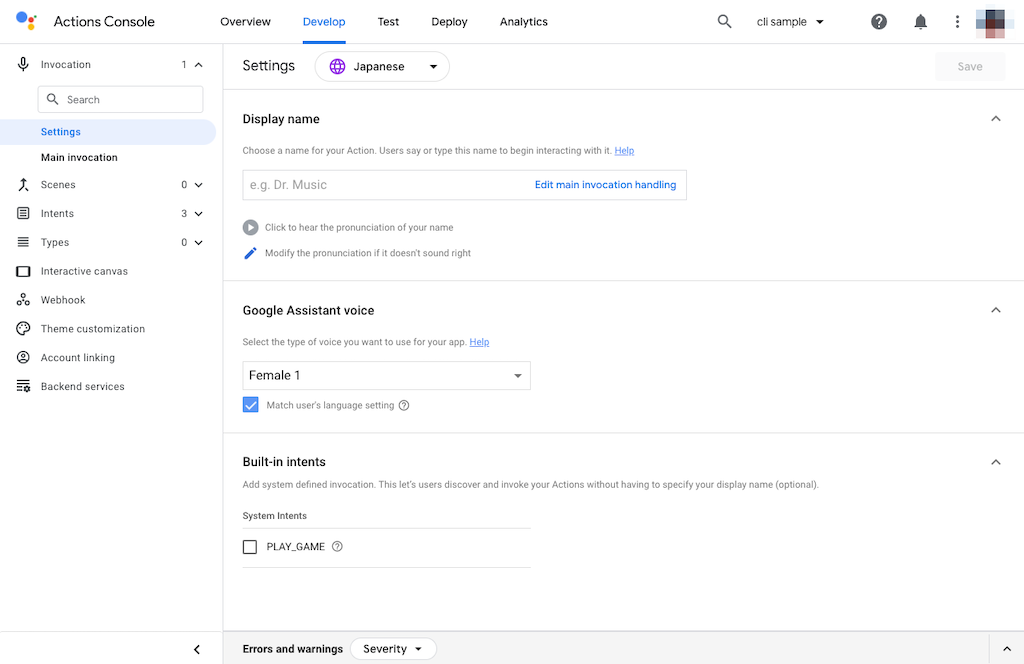
ちなみに、AoGでプロジェクト作成した際に言語設定とかしてたのはまるっとsettings.yamlの設定で上書きされるようで、言語が英語になっていました。
まとめ
とりあえずquick start guideをやってみただけで結構色々躓いたのですが、なんとなくcliでの流れも見えました。また、Actions on GoogleやActions BuilderのGUIで設定されているものが、設定ファイルにするとどういうふうになるのか、もわかるので、一度やってみることをおすすめします。